Monday, August 15, 2011

Pattern Report: Kwik Sew 3700, Scrap Fabric Purse

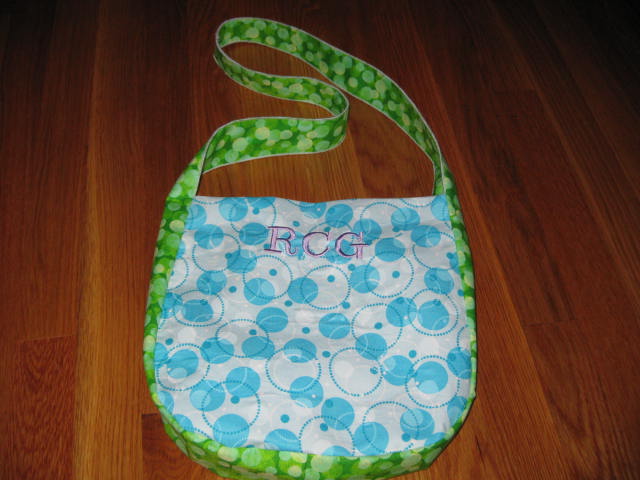
Kwik Sew 3700, as adapted
Since we sew, we have scrap fabric. Lots of scrap fabric. Accordingly, we are always looking for projects to take advantage a of scrap fabric. Of course, quilts are great for using scrap fabric...but these girls need variety.

We decided to combine my goal of learning to sew from patterns with our over all goal of using as many reclaimed materials as we can in out crafting and sewing projects. Enter Kwik Sew 3700, a pattern to make four different types of bags and purses using a serger or sewing machine.

My daughter, who is back from camp, helped me create the first bag as a gift for a friend. Yay! I missed her and am happy to have her back so we can play together. :)

Personalized, embroidered bags and purses are great birthday presents and we always enjoy trying new designs. For this project, my daughter selected version B of Kwik Sew 3700 and two different scrap fabrics from our ever growing box of scrap fabric. One fabric was the remnants of some shorts made for camp. The other fabric was remnants from some fabric we found on sale for $1/yard at our local Hancock Fabrics that I have been using to create muslins for new patterns.

The instructions for version B of Kwik Sew 3700 seemed odd to me. It was unclear to me whether or not the instructions called for interfacing in all pieces or just or the front and back panel. I cut fusible interfacing for all the pieces, ironed the interfacing in place and then used our embroidery machine to embroider initials on one side of the bag before beginning construction. The instructions also appeared to have exposed overlock seams. Instead, I sewed the bag using a three thread rolled edge and then turned the bag inside out so no seams were exposed.

We debated whether to add a snap or velcro closure to the top of the bag. We had leftover velcro from another project and so my daughter opted for velcro to secure the top. The closure was needed not just to keep contacts inside the bag but to ensure that the bag fell properly when worn-- especially if the bag was not very full when used.

The finished bag did look a lot like the picture. Overall, a nice pattern as adapted.

Related Tutorials 
Make a Grocery Bag from Scrap Fabric
Make a Grocery Tote Bag from a T-Shirt
Make a Purse from Blue Jeans Shorts
Make a Throw Blanket from Old Sweaters

Pattern
 Kwik Sew 3700

Friday, August 12, 2011

Pattern Report: Successes & Failures for Summer 2011

So my goal this summer was to learn to sew from patterns, rather than drape and sew using items hanging in my closet as a guide for sizing. Last week, I outlined some of the tips I learned about successful pattern execution. The analytical side of me wants to set out my scorecard of successes and failures.

Obviously, what is a success and what is a failure is subjective. For my purposes, the definition is simple: the project is a success if I liked the garment and either I (or one of my kids) enjoyed wearing it. The garment was a failure if I never wanted to wear it. Failures will be taken apart and the fabric reclaimed for future projects.

Here is my score card to date: 

Successes                                                Failures
*Vogue 8534 (dress & blouse)                Vogue 8647 (dress)
Vogue 8278  (dress)                                Vogue 8632 (dress)
New Look 6915 (blouse/tunic/mini dress)
*Kwik Sew 3394 (T-shirt dress)              Kwik Sew 3225 (wrap dress; unusual construction)
*Kwik Sew 2982 (tank dress)                    Kwik Sew 2954 (wrap skirt)
Kwik Sew 3551 (night gown)
*Kwik Sew 3074 (shorts)
Kwik Sew 3700 (bag/purse)

The successful starred patterns I used multiple times.

While there were quite a few failures (bummer), the success column is greater. Yay! Back to sewing.

Related Entries
Pattern Report: Kwik Sew 322
Pattern Report: New Look 6915
Pattern Report: Two-Tone Purple Color Blocked Dress
Tips on Using Sewing Patterns
Embroider a Belt Made from Scrap Fabric for Kwik Sew 3394
Use Your Serger to Make a Belt from Scrap Fabric for Kwik Sew 2982

Thursday, August 11, 2011

Pattern Report: Kwik Sew 3225 Dress

Kwik Sew 3225
Yesterday I finished making Kwik Sew 3225. I am not sure how I feel about this dress. On the hanger, it looks really cute. I am very pleased with the decorative stitching I added to the yoke of the dress in lieu of top stitching.
Decorative stitching at yoke

The problem with the dress is the way the sides sag. Sometimes the sagging is just unsightly. Sometimes the sagging reveals bra. Not a pretty look. I added snaps to help deal with the issue, but the snaps caused the dress to lay funny.

I've decided the pattern may work, but just not for me. Bummer. I really liked the look of the dress on the pattern envelope and on the hanger. On me, not so much.

Reference
"Easy Sewing the KWIK SEW Way"; Kerstin Martensson; 2002.

Pattern
Kwik Sew 3225

Wednesday, August 10, 2011

Pattern Report: New Look 6915 Dress

Trina Turk Eye Candy
What my husband calls fashion porn arrived in the mail today: another fall collection, this one from Lord and Taylor. In the mailer was yummy dress designed by Trina Turk, a simple, elegant silk with a bold print. I don't like the lining she and other RTW designers use in many silk dresses. What's the point of wearing silk if you have polyester next to your skin? The design in the dress is a shape I wear and sew (in different lengths and variations) year after year.

I found a really nice cotton print that I wanted to make up using a similar design. Thumbing through my collection of patterns, I noticed that version A of New Look 6915 would fit the bill if I added to the length.

I cut a size 8 of New Look 6915 (version A) but added 6-1/2 inches in length to create a dress that hit just above the knee. I basted the seams and the dress fit perfectly.... but all was not well.

The scissor elfs were playing games again. I cut the size eight facings for the size 8 top and the facings did not fit. Not even close. I checked to see if I cut the wrong facing for the top or if my sizing was off for either, but it looked as though I had cut per instructions. Oh, well.

New Look 6915, as modified
Now I had a problem to solve. The pattern called for 2-1/4 yards of fabric for a mini-skirt.  I had only 2 yards and I was adding 6-1/2 inches to the bottom of the pattern. I had enough to cut all the pieces on the fold as instructed, leaving plenty to make the belt from the left-over around the selvage....but I did not have enough material for a do-over on the facing. Oy.

To work around the facing issue, I serged a three thread rolled hem on the neckline and arms before stitching the dress together. I used my serger to create a matching hemline. Since serged edges figured prominently in the dress, I skipped the instructions for the belt altogether, cut a 2-1/2 inch piece of fabric for the belt and then serged all the way around the edges using the technique explained in my earlier tutorial.

Pattern
New Look 6915 version A.

Related Tutorials
Embroider a Belt Made from Scrap Fabric
Use Your Serger to Make a Belt from Scrap Fabric

Tuesday, August 9, 2011

Make Your Own Decorative Pattern Weights

The other day my daughter and I were in a shop and she held up a package of brightly colored objects and asked me, "what are these used for?" The items were pattern weights and I explained that they were used to hold down a pattern when cutting fabric.

If you are close to your mother or daughter, then you know the look that passes between two women that means, "I am laughing my butt off right now, but I know I need to get out of the store before I do." Well, my daughter gave me that look and we had to rush our purchase to get out of the shop without hurting feeling and with our dignity still in tact.

Tuna cans used as pattern weights
It seems my wise and worldly daughter did not know that some folks pinned patterns and others used items other than tuna fish cans or washers to hold down patterns when they cut.

The experience was good. My daughter suggested that we ought to color our washers (aka pattern weights). She is correct. Tools are more enjoyable when pretty.

There are a LOT of ways to color washers, but we decided to use resin, a technique we've used before to make pendants and other jewelry.

Materials
large, heavy round washer (1.25-inch to 4.5-inch), stainless steel or brass
Postcard or decorative paper
Diamond Glaze or Mod Podge
Bowl of water (to clean paint brush)
Transparent embossing powder
Scrap paper

Tools
Inexpensive, artist paint brush

Xacto craft knife
Self-healing cutting mat
Heat It Craft Tool


Step 1
Select the washer and the paper you want to use to decorate your washer. For pattern weights, the weight of your washers will be as important as the size. You want large and heavy. For paper, you want pretty.  In our example, we used a 1-1/4-inch round washer and a post card sent to use in the mail with a copy of a painting entitled "Change"by Oh Su Fan announcing the "In and With: Contemporary Korean Art" exhibit at the Cantor Fitzgerald Gallery at Haverford College. Post cards are heavy, coated paper that do not run when coated with glue or embossing powder.

Step 2
Determine how you want to arrange the paper on the washer. Glue the washer to the back side of the paper using a glue stick (or glue of your choice) in the space that highlights the design you want to use.

Step 3
Place the washer on the cutting mat and use a craft knife to cut away the excess paper. Note: It is best not to use the same cutting mat for crafts as you do for fabric.

Step 4
Paint Diamond Glaze or Mod Podge on the paper using a paint brush until it is completely coated. Paint the sides of the washer to seal the paper to the washer. If bubbles appear, pop them using a toothpick or your finger. Check to be sure the coat is even.

Wash the paint brush immediately with water to prevent the brush from becoming glued together and no longer usable.

Step 5
Before the coat of Diamond Glaze or Mod Podge is dry, place the washer on a clean piece of scrap paper and sprinkle transparent embossing powder over the glue painted paper surface of the washer.

Step 6
Tap off excess embossing powder. (We use a second piece of scrap paper to catch the excess so we can reuse the embossing powder).

Check to be sure the embossing powder is even. Sprinkle again (and remove excess again), if needed, to even out surface.


Decorate washer to create pattern weight
Step 7
Use the heat tool to melt the embossing powder. Heat evenly until all the embossing powder melts and coats the paper surface of the washer and the side of the washer. Check to be sure the paper is sealed onto the washer. Allow the embossing powder to cool.

Warning: Do not test the embossing powder with your finger to see if it is done and dry! Ouch. Not only will you have unsightly fingerprints, hot embossing powder will stick to your hand and may cause a burn.

Step 8
Repeat, as needed, to create other pattern weights.

Related Tutorials
Cold Enamel a Washer to Make a Pendant
Make a Three Strand Bracelet from Copper Washers
Make a Bib Necklace from Washers
Make a Stamped Pendant from a Washer

Monday, August 8, 2011

Make Replacement Buttons Using Polymer Clay

It happened just the other day. One of my kids lost a button and there was no way to replace it. The button was a unique shape and color so our only choice was to try to replicate the button from one of those still on the garment. Depending on the the button, it may not be difficult to do.

Part 1: Make a Mold of the Button

Step 1
Make a mold of the button using polymer clay. Our favorite polymer clay for mold making is Super Sculpey Polymer Clay in Semi-Transparent Beige-Pink but any clay will do. If we are out of Super Sculpey, we often use scrap polymer clay to make molds.

Step 2
Condition the polymer clay by kneading or running the polymer clay through a pasta machine
for craft use.

Step 3
Roll the conditioned polymer clay into a ball that is larger than the button you want to make replicate.

Step 4
Press the polymer clay down so that the ball is flat on one side. This will be the bottom. It is easier to use polymer clay molds with flat bottoms.

Step 5
Cover the button to be replicated with a very light dusting of corn starch using your fingers or a paint brush.

Step 6
Place the button to be replicated on your flat, clean work surface, such as a slef healing cutting mat. Turn the clay over and press the clay down onto the work surface so that the molded item is in the center of the clay.

Step 7
Pick up the molded clay and remove the button.You may need to use a polymer clay blade or knife to remove the mold from the work surface.

Step 8
Bake the mold according to the polymer clay manufacturer's instructions.

Part 2: Use the Mold to Create a Replacement fro the Lost Button

Step 9
Mix additional polymer clay in colors that replicate the missing button. Note that it may take some time and experimentation with different polymer clay colors and brands to get he color correct.

Step 10
Prepare the polymer clay mold you made of the button with a light dusting of corn starch.

Step 11
Press the mixed clay into the polymer clay mold you made of the lost, no longer available button.

Step 12
Remove the clay from the mold.

Step 13
Use a tool to poke two or four holes in the clay to create the button. You can use a jewelry sized drill bit, bamboo skewer, pen point, pottery tool, straw or other device to create the holes for the button.

If the button has a shank rather than holes, use your hands to form a shank to attach to the back of the button. Use a pottery tool or craft stick to attach the shank to the top of the button.

Step 14
Fire the polymer clay replacement button in a polymer clay oven according to the polymer clay manufacturer's instructions.

Related Tutorial
Make Polymer Clay Buttons

Further Reading 
"Polymer Clay 101: Master Basic Skills and Techniques Easily through Step-by-Step Instruction"; Kim Otterbein, Angela Mabray; 2011.
"The Art of Jewelry: Polymer Clay: Techniques, Projects, Inspiration"; Katherine Duncan Aimone; 2011.
"Polymer Clay Beads: Techniques, Projects, Inspiration (Lark Jewelry & Beading)";  Grant Diffendaffer; 2011.

Sunday, August 7, 2011

Make Polymer Clay Buttons

Buttons can transform any garment. Adding artistic buttons to an old garment can give it a new look and a new life. Crafting your own buttons to match your hand made clothing will add value to your creations. Using polymer clay, you can make all sorts of buttons to enhance your RTW or handmade clothes.

Materials
Premo! or other polymer clay of your choice
Corn starch

Tools
Pasta machine (optional)
Floral mold (optional)
Jewelry sized drill bit, bamboo skewer, pen point, pottery tool, straw or other device to create holes
Polymer clay oven or toaster oven dedicated to crafts

Step 1
Gather your polymer clay supplies.

Step 2
Determine what color and brand polymer clay you want to use. In this example, we used Premo! translucent mixed with a small amount of blue.

Step 3
Condition your polymer clay before making it into polymer clay buttons by kneading it or passing it through a pasta machine (dedicated to crafts) many times.

Step 4
Dust the mold with cornstarch so the polymer clay does not stick to the mold.

Step 5
Press the clay into the prepared mold. Use your hands, alone or in conjunction with the mold, to create the shaped polymer clay buttons you desire.

Step 6
Remove the polymer clay from the mold. Use a straw, drill bit, pen point or other device to create holes in your polymer clay buttons. Shape as needed with your fingers to remove rough edges.

Step 7
Repeat to create the number of buttons you need.

Step 8
Bake the buttons in your polymer clay oven according to the polymer clay manufacturer's instructions. We usually bake our polymer clay buttons at 275 degrees for 30 minutes to an hour, depending on the thickness of the polymer clay buttons.

Further Reading 
"The Complete Book of Polymer Clay";Lisa Pavelka; 2010.
"The Art of Polymer Clay Millefiori Techniques: Projects and Inspiration for Creative Canework"; Donna Kato; 2008.
"The Encyclopedia of Polymer Clay Techniques: A Comprehensive Directory of Polymer Clay Techniques Covering a Panoramic Range of Exciting Applications"; Sue Heaser; 2007.
"The Polymer Clay Techniques Book"; Sue Heaser; 1999.