Monday, August 29, 2011

Pattern Report: Kwik Sew 3700, version D, clutch

Kwik Sew 3700 clutch
I love patterns that include multiple styles. I like choices and I like to be able to try different techniques. The other day my daughter and I used scrap fabric and the pattern for version B of Kwik Sew 3700 to make a purse as a gift.

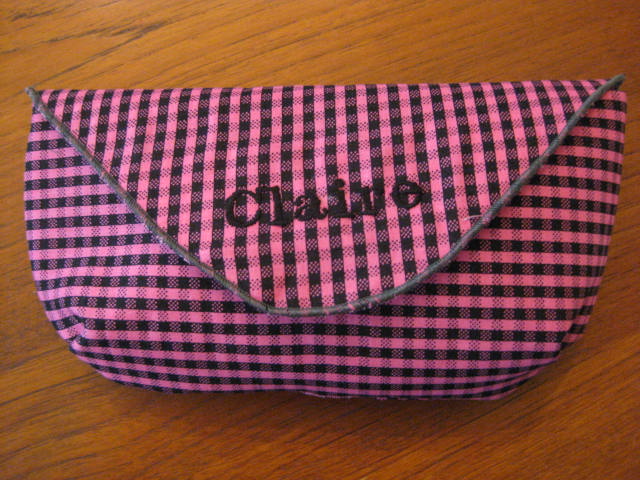
Today my daughter and I  share version D of Kwik Sew 3700 that we made as another gift for another friend. The pattern was cute and the clutch purse we made did come out looking like the bag on the package. Yay!

Cut the fabric
My daughter embroidered the name on the fabric using our embroidery machine before cutting the fabric.  She cut the pattern while the machine embroidered and then asked me to take over so she could Skype.  We were on a deadline as we needed the present for a party.

I cut the fabric (taking care that the name was placed correctly on the flap) and cut heavy Pellon fusible interfacing. The pattern made a facing optional, but after discussing it, we opted to face both sides of the purse. I ironed the interfacing to the fabric.

Serge the point
After cutting the pieces, I departed from the instructions. I used my sewing machine to sew the two notches on the bottom of the purse and then I used my serger to make a rolled edge on the "V" point of the purse flap.

Serge the seam
I pinned the two pieces of the purse together and then basted the purse using a 1/4-inch seam allowance. I then serged the purse, again using a three-thread, rolled edge.

Once the purse was serged and I checked my work, I turned the purse inside out so the seam no longer showed.

My daughter then added velcro to fasten the purse. She then added a wire wrapped ring and a set of earrings she made to "fill" the purse.

This is a quick, fun project that we will make again. Great teamwork.

Related Reading
Pattern Report: Kwik Sew 3700, Scrap Fabric Purse
Make Wire Wrapped Rings
NJAD Index by Type of Found Object
NJAD Index by Type of Jewelry Made with Found Objects


Further Reading
"Exclusively You: Easy Fabric Purses (Leisure Arts #4228)"; Leiasur Arts; 2006.
"It's a Wrap: Sewing Fabric Purses, Baskets, And Bowls"; Susan Breier; 2006.
"Making Vintage Bags: 20 Original Sewing Patterns for Vintage Bags and Purses"; Emma Brennan; 2007.
"The Bag Making Bible: The Complete Guide to Sewing and Customizing Your Own Unique Bags"; Lisa Lam; 2010.
"101 Fabulous Fat-Quarter Bags with M'Lis: 10 Projects for Totes & Purses Ideas for Embellishments, Trim, Embroidery & Beads Stylish Finishes-Handles & Closures"; M'Liss Rae Hawley; 2008.

Friday, August 19, 2011

Make Earrings from Scrap Fabric

Earrings from Scrap Fabric
My daughter and I have been working hard to reuse as much as possible when sewing and crafting. Sometimes using found materials is inspiring, sometimes its a lot easier to go buy new. We've a bunch of these lightweight fabric earrings from scrap fabric. The earrings can be made as large or small as you like and are a great way of creating a new fashion accent from trash in only 30 minutes or less. Overall, a winning combination.

Materials
Scrap Fabric
Pellon fusible interfacing (in light or medium weight)
Serger thread (light blue)
Needle
Fishhook earring findings (surgical steel, silver plate, gold plate, copper
 or sterling silver)

Tools
Serger
Chain nose pliers

Measure the fabric
Step 1
Cut four pieces of scrap fabric into 2.5x2.5 inch squares. Cut two pieces of fusible interfacing into 2.5x2.5 inch squares.We used scrap fabric and scrap interfacing, any selection of woven fabric will do. Heavier interfacing will give more structure to the earring, but lightweight interfacing will work.
Cut the fabric into a square

Step 2
Iron the fusible interfacing to the back of two of the cut 2.5x2.5 pieces.

Step 3
Sandwich the fusible interfacing between the fabric and use a three thread rolled edge to sew the pieces together until the square is framed by the rolled edge. We used
Serge the edge to create frame
a light blue thread to frame our fabric and sewed with a 1/4-inch seam allowance so the resulting fabric earring was a 2x2 square.

Leave thread tail
Do not cut the last serger thread. Instead, leave the thread long enough to create a loop and tie the thread into a knot just above the top corner of the fabric diamond.

Tie thread to create loop
Step 4
Tie the serger thread and knot.

Step 5
Add earring finding
Use pliers to open the ring of the fishhook earring finding. We used a gold plated, brass finding. Feed the loop onto the ring of the finding. Use your pliers to close the loop, securing the earring to the finding.

Repeat to create second earring
Step 6
Repeat to create matching earring.

Related Tutorials
Make a Handkerchief from Scrap Fabric
Use Your Serger to Make a Belt from Scrap Fabric
Make a Grocery Bag from Scrap Fabric

Further Reading
"Fabric Jewelry: 25 Designs to Make Using Silk, Ribbon, Buttons, and Beads"; Teresa Searle; 2008.
"Felt, Fabric, and Fiber Jewelry: 20 Beautiful Projects to Bead, Stitch, Knot, and Braid"; Sherri Haab; 2008.
"Fabric Jewelry Wrapped, Braided and Sewn"; Heidi Pridemore, Nancy Zieman

Wednesday, August 17, 2011

Sewing Apps

The other day I was shopping for fabric and the clerk asked me why I was starring at my phone. Fair question. I keep a list of items I need/want on my notepad and I have a number of sewing apps on my phone that I find useful.... so I thought I would share.

Sewing Kit allows me to keep an inventory of patterns I own and patterns on my wish list. At $8.99, it is a little on the pricey side, but less than the cost of purchasing one pattern by mistake. Some reviews criticize the app as crashing a lot, but most of those reviewers took photos of fabric and to create a fabric portfolio in the app. I do not have enough of a fabric stash to need a mobile inventory and so I have not used the fabric inventory function. My experience has been mostly stable and I enjoy having my pattern information with me when I decide what fabric/notions I need and how much to buy.

There are a growing number of free apps that I enjoy:
Craftgawker is great for finding craft inspiration.
Fabric Converter helps you calculate how much fabric you will need for a project in alternate widths so you buy just enough, but not too much fabric for a given project.
Jo-Ann has a store finder, product search and coupons.
Quilting Calculator helps calculate the needed fabric for borders, binding, backing, batting and piecing. Calculations can be made in metric or yards.
Quilting has short videos demonstrating different quilting techniques. I find these fun to watch, especially when waiting in line.
Quilting Daily has blog entries about quilting, videos featuring different sewing and quilting techniques and a glossary of quilting terms.
Planet Embroidery allows me to draft text based designs in a variety of fonts and then email the design to myself.

Enjoy!

Make a Handkerchief from Scrap Fabric

Handkerchief made from scrap fabric
I love handkerchiefs and I always carry one in my purse, one in my pocket, one in my briefcase .... you get the idea. My kids also like handkerchiefs, but often forget to carry them. Hence, the need for multiple handkerchiefs in multiple places. I need lots of handkerchiefs. My handkerchiefs get lost. They hide in pockets of coats, clothes and purses-- only to be found a season later. Making handkerchiefs is a great way to take advantage of scrap fabric and to refashion old, torn or stained clothes.


Tools
Fabric scissors
Rotary cutter
24 x 36 self healing mat
6 x24 quilting ruler
Embroidery scissors
Sewing Machine or Serger (optional)

Materials
scrap fabric in cotton or linen or 1 cotton or linen shirt
Serger thread or sewing thread
Needles

Cut fabric
Step 1
Measure the fabric using a ruler to check for size. Use scissors or a rotary cutter and mat to cut a piece of fabric from the back of the reclaimed shirt. Cut an 11-3/4 x 11-3/4 inch square for a ladies' handkerchief or 16x16 inch square for a mens' handkerchief.

I have no credible answer as to why handkerchief sizes are different for mean and women, but industry standard does dictate different sizes. In my house, we use handkerchiefs interchangeable and make most the larger size designed for men when making handkerchiefs for our personal use. Only when we make gifts do we conform to industry standards, since size may matter to the gift recipient. LOL

The fabric pictured was cut from an old sheet, but any scrap fabric can be used whether from leftover sewing projects or reclaimed fabric from old clothes, sheets or other sources. Old clothes and sheets are great for making handkercheifs as the fabric tends to be quite soft.

Step 2
Hem the edges
Hem the edges. We used a serger to create a three thread, rolled hem edge, but you can use a sewing machine and a hemmer foot to create a similar look or you can hand sew the edge after double folding the edges.

Step 3
Trim threads using embroidery scissors.


Further Reading
Decorate a Handkerchief
Make a Machine Embroidered Handkerchief

Tuesday, August 16, 2011

Make a Machine Embroidered Handkerchief

Embroidered handkerchiefs make great presents. Now that we have a new embroidery machine, we've been practicing designs and lettering on handkerchiefs. We took some ordinary handkerchiefs and we made them special....and we took scrap fabric (some from old projects and some from old clothes), cut the fabric into a handkerchief sized square, serged the edges to make a handkerchief and then embroidered the handkerchief for a nice finish.

Handkerchief with monogram
Tools
Embroidery Machine 

Materials
White handkerchief
Tailor chalk
Sulky 40 weight rayon embroidery thread
Sulky Fabri-Solvy stabilizer
Sulky KK2000 spray adhesive
Sulky water soluble stabilizer

Step 1
Select the design and organize your thread. We like to place the thread in the order we plan to sew it so we make few mistakes.

Step 2
Use tailor chalk to mark the handkerchief where you place to embroider.

Step 3
Prepare the handkerchief by spraying the back of the area to be embroidered with adhesive spray and then sticking the fabri-solvy stabilizer over the glue. If the design is detailed, spray the front of the handkerchief with adhesive glue and stick Solvy water soluble stabilizer to the front of the handkerchief. If the design is not thick and detailed, then stabilizer on the back alone may be sufficient.

Step 4
Place the handkerchief in the hoop of the embroidery machine.

Step 5
Stitch the design.

Step 6
Dissolve the stabilizer in water.

Further Reading
"Machine Embroidery With Confidence: A Beginner's Guide"; Nancy Zieman; 2005
"Creative Beginnings in Machine Embroidery: Innovative Ideas for Expert Results"; Patty Albin; 2006.
"Embroidery Machine Essentials: How to Stabilize, Hoop and Stitch Decorative Designs";  Twigg Jeanine; 2001.
"Machine Embroidery on Difficult Materials (Book & CD Rom);  Deborah Jones; 2009.
"Machine Embroidery Wild & Wacky: Stitch on Any and Every Surface"; Linda Turner Griepentrog, Rebecca Kemp Brent; 2006.